With the release of vRA 8.11 you can now make use of Custom Names by enabling this feature through the UI.
Enable Custom Names
To enable the new Custom Names option, go to Infrastructure, Custom Names
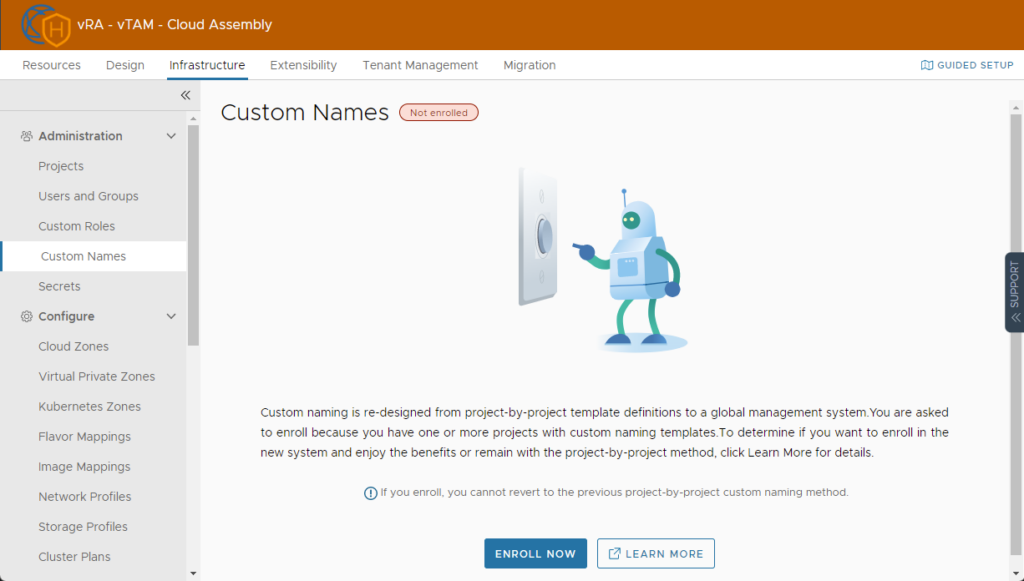
Click Enroll Now to continue. In the next screen you can choose whether or not to migrate custom naming templates from other any projects.

The Do not migrate method is recommended because the project and resource-level improvements are significant. To take advantages of the changes, you must build new custom naming templates.
The Migrate method creates one template for each project that has a template. Depending on the number of projects with templates, migration might result in many templates to manage. It is also possible that some templates fail to migrate due to unsupported formats. Migration is not guaranteed for all the naming templates. Migration can result in an unmanageable number of project-level templates.
Based on the above and my environment, I chose “Do not migrate”
After Custom Naming Enrollment was successful, you are congratulated and get a thumbs up.
As stated in the beginning; If you check one of your projects and go to Custom Naming, you will notice there is no Custom Naming found / configured.
1. Naming Convention
First let’s have a look at my naming convention which looks like this:
<initial-1><initial-2><Environment><#####>, where
|
initial-1 |
|
|
ps |
physical server |
|
vs |
virtual Server |
|
initial-2 |
|
|
li |
Linux |
|
wi |
Windows |
|
Environment |
|
|
d |
Development |
|
t |
Test |
|
a |
Acceptance |
|
p |
Production |
|
##### |
<Random Generated Number> |
An example hostname could be vslid00002 where:
vs virtual
server
li
linux
d.
Development
0002 random generated number
Cloud template
In my Cloud template I have created a property called name under the vSphere Machine resource, combining all the input properties to create the main part of the name. The random numbering will be added through the custom naming feature.
VM: type: Cloud.vSphere.Machine properties: name: vl${input.Deploy.initial1 + input.Deploy.initial2+ input.Deploy.Environment}
4. Create Custom Name and Naming Templates
With the above information, it is finally time to configure the Custom Naming!
Go to Infrastructure, Custom Names and Click “New Custom Name”
In my example I have chosen to create an Organization Custom Name, but if you have some special requirements, you can also create a project based Custom Name. The differences are as follows:
Organization: Create a default naming template that is applied to all deployments that do not have a project-level naming template.You cannot create more than one organization template. If the organization scope is not available, one already exists.
Projects: Create a naming template specific to the assigned projects. If both an organization and a project template exist, the project naming template takes precedence over the organization template.
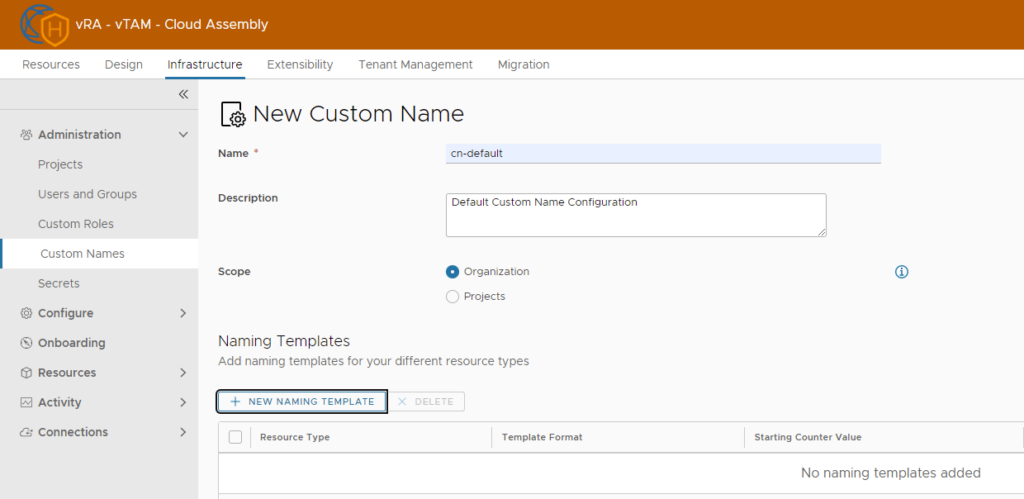
Click New Naming Template. You will notice you can select different resource types:
- Machine
- Network
- Storage
- Load Balancer
- Gateway
- NAT
- Security Group
For all these Resource Types you can setup custom naming, including their own Starting counter value and increment step. Next to that you can define matching patterns to configure unique numbering within each resource type.
I have configured a Naming Template for Machine and Network. For the Machine Resource Type, I chose ${resource.name}${####} where the ${resource.name} variable is configured in the cloud template as described above.
Based on my naming convention, I have created different matching patterns that will allow for a unique numbering for every combination of elements. This list can grow quite larger if you have a complex naming convention and the screenshot does not contain all possible combinations.
Note that you cannot change the Template format after it has been created, nor the Pattern Text, but you can add and remove matching patterns afterwards.