Tagging, Custom Properties
With vRA8 comes a new way to manage your machine metadata. In the new platform, there are tags, capability tags, constraint tags, standard tags, project tags, project constraint tags, and custom properties. There is a bit of tag overload going on here. Some of these tags are used in placement decisioning, some of them propagate from higher level objects and go on to set tags on the endpoint itself, and some of them do not. According to the VMware documentation, each of the referenced tag types are defined as follows:
• Capability Tags: enable you to define placement logic for deployment of infrastructure components.
• Constraint tags: You add constraint tags to blueprints and various other components within vRealize Automation Cloud Assembly to match capabilities defined on resources, cloud zones, and profiles to generate appropriate deployments.
• Standard tags: vRealize Automation Cloud Assembly applies standard tags to some deployments to support analysis, monitoring, and grouping of deployed resources. Note: although these are documented, I cannot seem to find them whether in the GUI or the API. I’m not sure of the overall intent behind them, or where they may actually be able to be referenced since they are not readily accessible in either the API or the GUI.
• Project Resource Tags: A project resource tag operates as a standardized identifying tag that you can use to manage the deployed resources and ensure compliance.
• Project Constraint Tags: A project constraint operates as a governance definition. It is a key:value tag that defines what resources the deployment request consumes or avoids in the project cloud zones.
This simple example uses development and production environment tags to demonstrate how to use capability and constraint tags. First, you add capability tags on vCenter Server resource pool compute resources, and then you include the tags in the cloud template. The cloud template example demonstrates how to use inputs to let the deploying user select whether to deploy it to a development or to a production resource pool.
For an example of how to use the same tags to define placement in a multi-cloud environment, see source Tutorial: Setting up and testing multi-cloud infrastructure and deployments in Cloud Assembly.
- Add capability tags to resource pools.
- Open the cloud zone and click Compute.
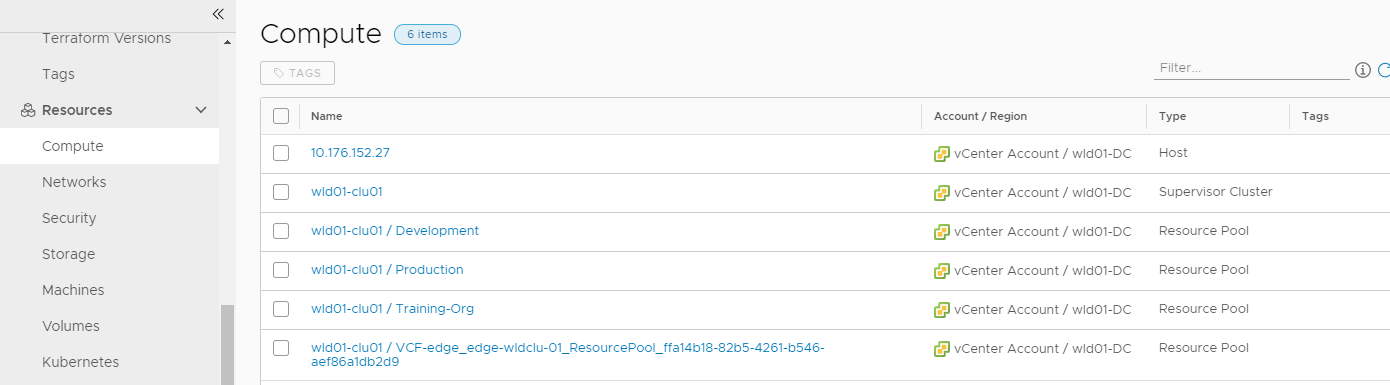
- Select Infrastructure > Resources > Compute.
- Locate and click the resource pool that you want to deploy development workloads to.
This tutorial uses the following sample values. Remember that these values are only examples. Your values will be specific to your environment.
|
Sample resource pool |
Sample tag |
|
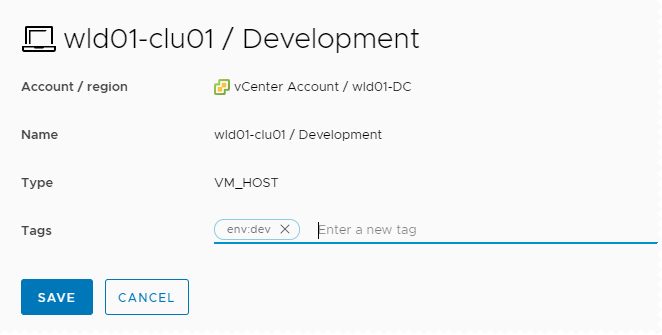
wid01-clu01 / Development |
env:dev |
|
wid01-clu01 / Production |
env:prod |
- Add the tag env.dev
and click Save.
- Repeat the process for the resource pool that you want to deploy production workloads to and add the env:prod tag.
- Verify that the capability tags were added to the resource pools in your cloud zone.
- Select Infrastructure > Configure > Cloud Zones.
- Open the cloud zone associated with the project and click Compute.
In this
example, the cloud zone is vCenter Account Cloud Zone and the tags were added
to the two resource pools, wid01-clu01 / Development and wid01-clu01 /
Production.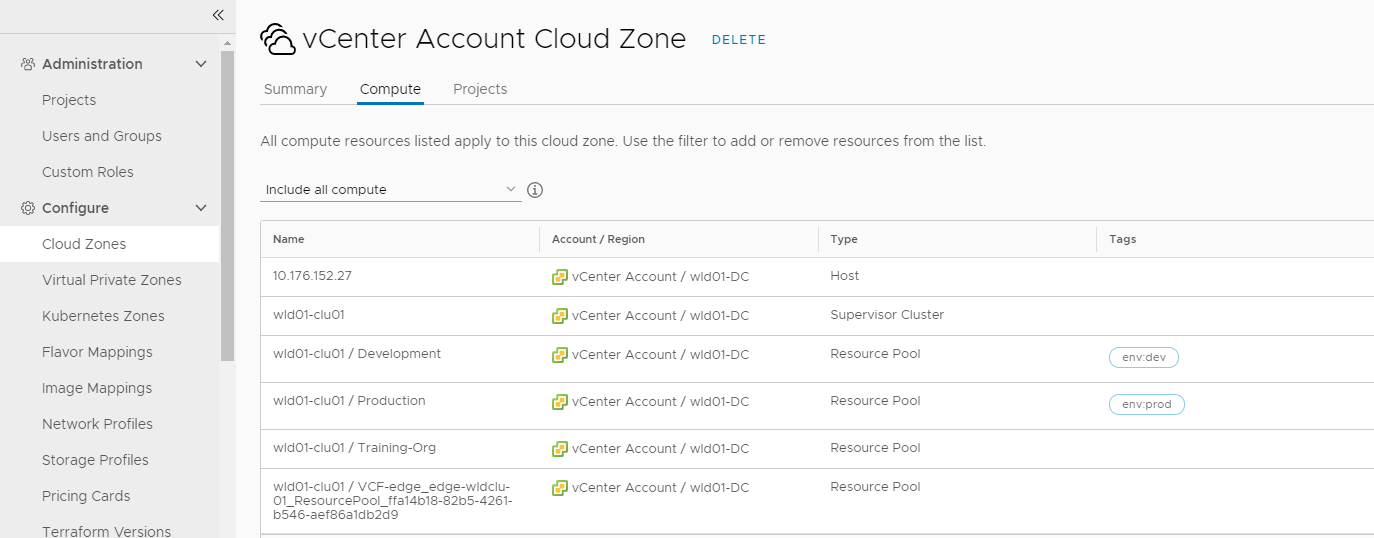
- Add constraint tags to the cloud template.
Constraint tags are used to limit where the template is deployed.
- Select Design > Cloud Templates and then open your template.
In this tutorial, the template name is Development Template.
- Review the YAML for the template in the Code pane. This YAML is the starting point for this tutorial.
formatVersion: 1
inputs: {}
resources:
Cloud_vSphere_Machine_1:
type: Cloud.vSphere.Machine
properties:
image: centos
flavor: medium
networks:
- network: '${resource.Cloud_NSX_Network_1.id}'
attachedDisks:
- source: '${resource.Cloud_vSphere_Disk_1.id}'
Cloud_vSphere_Disk_1:
type: Cloud.vSphere.Disk
properties:
capacityGb: 5
Cloud_NSX_Network_1:
type: Cloud.NSX.Network
properties:
networkType: existing
· Add the constraint tag to the Cloud_vSphere_Machine_1 resource using ${input.placement} as a variable.
resources:
Cloud_vSphere_Machine_1:
type: Cloud.vSphere.Machine
properties:
image: centos
flavor: medium
constraints:
- tag: '${input.placement}'
networks:
- network: '${resource.Cloud_NSX_Network_1.id}'
attachedDisks:
- source: '${resource.Cloud_vSphere_Disk_1.id}'
· Define the placement variable in the Inputs section.
inputs:
placement:
type: string
enum:
- env:dev
- env:prod
default: env:dev
title: Select Placement for Deployment
description: Target Environment
· Verify that the final YAML looks similar to the following example.
formatVersion: 1
inputs:
placement:
type: string
enum:
- 'env:dev'
- 'env:prod'
default: 'env:dev'
title: Select Placement for Deployment
description: Target Environment
resources:
Cloud_vSphere_Machine_1:
type: Cloud.vSphere.Machine
properties:
image: centos
flavor: small
constraints:
- tag: '${input.placement}'
networks:
- network: '${resource.Cloud_NSX_Network_1.id}'
attachedDisks:
- source: '${resource.Cloud_vSphere_Disk_1.id}'
Cloud_vSphere_Disk_1:
type: Cloud.vSphere.Disk
properties:
capacityGb: 5
Cloud_NSX_Network_1:
type: Cloud.NSX.Network
properties:
networkType: existing
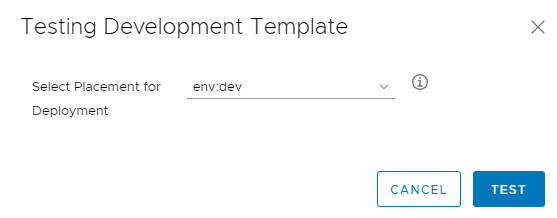
- To try out the tag variable against the
available resources, click Test and then select env:dev.
Repeat the test using env:prod. When both tests are successful, confirm that the template works by deploying it.
· Deploy the template to test the workload placement.
- In the cloud template designer, click Deploy.
- Enter Deployment Tag Dev as the Deployment Name and click Next.
- Select env:dev in the Select Placement for Deployment drop-down menu and click Deploy.
· Verify that the template deployed the resources to the selected resource pool.
- Select Resources > Deployments and locate the Deployment Tag Dev deployment.
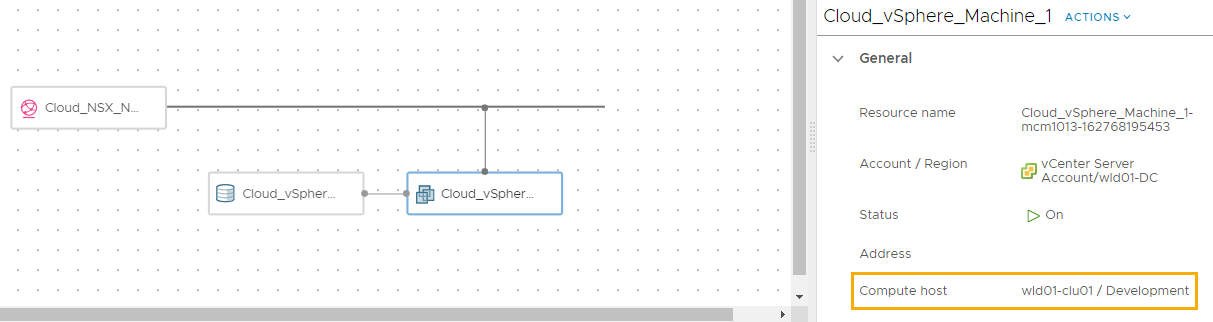
- Open the deployment details and click Topology.
- Click the vSphere machine and expand the machine information in the right pane.
- In the General section, locate Compute host and verify that the value matches the resource pool that matches your env:dev tag.
In this example, the value is wid01-clu01 / Development, illustrating that the workload was deployed to correct resource pool based on the selected constraint tag.
- Repeat the deployment process, this time select env:prod
In vRA8, custom properties are not like they were in vRA7. Custom properties can still be applied to a resource to specify metadata about that resource, but they are noticeably missing from infrastructure endpoints, and appear to be limited in total functionality.From what I can tell, the only tags/custom properties/metadata that propagates down to deployed.
resources — such as virtual machines — are project resource tags and tags set on the resource itself in the blueprint. I see this change as a major shortcoming in the product. Developers have realized simplified provisioning by being able to set Custom Properties directly where they were most applicable. Without the capability to specify metadata on the endpoints (cluster, vCenter, storage, network, etc.) and to have that metadata propagated during deployment, it can potentially lead to increased blueprint complexity, blueprint sprawl, and an increase in technical debt.